Monday 23 November 2015

Koala Christmas Card!


Koala Christmas Card

Just look at this adorable Christmas card that I created using two different stamp sets. I saw the little Koala with his paw up and thought that he would look so cute holding up some decorations. Then I saw the branch on the Joyful Garland stamp set and the design came to me!

 
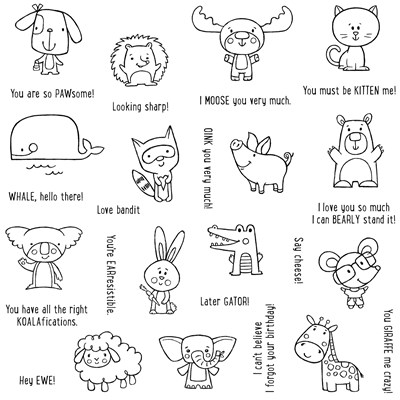
The Operation Smile stamp set is called Animal Greetings D1679 $27
Isn't it sweet?! You will find it on the back cover of your current Annual Inspirations Idea Book, available until August 2016.
We donate $7USD from each purchase to Operation Smile, an organisation that provides surgeries for children with cleft lips and palates. Light up some smiles!
.

 The other stamp set I used is called Joyful Garland B1489 and it is only available to Hostesses or Consultants. If you host a Gathering with a couple of friends and your sales reach $200, you can get this stamp for FREE with your Host credits. Or place an order with me for $200 and you can also get your Hostess Rewards! Of course if you join my team as a Consultant, you can order any of the Hostess Rewards for yourself! You can find it on page 5 of our Holiday Expressions and is only available until the end of December 2015.

Let me show you how to make it!

The recipe for the card is Pattern #28 from  Make It From Your Heart Vol 2.

I used one of our Value Pack White Daisy card bases. 


Cut a Cranberry and a Topiary Cardstock Piece 4 x 1 3/4". Cut a White Pines B&T 4 x 1/2" then use a dauber to colour the edges of the three pieces in Black Exclusive Ink. Adhere these to the card as shown. Using Memento Ink, stamp the koala on a scrap of White Daisy then the branch and the three ornaments. Stamp the Merry Christmas with Cranberry Ink. 
Colour in with our ShinHan Alcohol Markers. The koala's tummy is Pastel Peach, body is Warm Grey, nose is Clay and cheeks are Tender Pink. Draw over the branch with a little Sap Green then colour the ornaments with Carmine and Golden Yellow. 
Cut the piece down leaving 1/4" border around your stamping. Mine is 2 1/2 x 3"Next use a dauber to colour the edges with Topiary Ink. Adhere a 5 1/4" strip of Gold Shimmer Trim 3/4" up from the bottom of the mats on your card. Apply 3D-foam tape to the back of your stamped piece and adhere to your card.


Here are some more cute cards I made using the Animal Greetings Stamp Set, scraps of fundamentals papers from our last Idea Book and Kaleidoscope papers from the current Idea Book.


Thanks for looking!

www.georgiaoshea.ctmh.com.au

Thursday 1 October 2015

Twinkle S1510 - CTMH October SOTM Blog Hop

Welcome to our Australasian Stamp of the Month Blog Hop
 for October 2015 
If you have arrived here from
then you are in the right place. If you landed here by accident, that's okay, please join in by following the link at the end of this post which will take you to the next Consultant's great idea. Don't forget to leave your comments and Pin any of the ideas you love to Pinterest!

Today I would like to share with you a Card Box which features October 2015 Stamp of the Month
available exclusively throughout October for $7.50 when you spend $75. Or just pay rrp of $27 for the SOTM if you don't need to place a  $75 order this month. 

You can make this Card Box to keep your Christmas Cards in that you create over the next couple of months, ready to hand out or post. Or you can give it as a gift for Christmas. Fill it with cards for any occasion to make a beautiful present for someone special! The lid even has a hidden magnet to keep it closed. Genius!


Journaling 
Card Box Z1953


Start with a sheet of White Pines B&T Duos and a sheet of Cranberry Cardstock. Cut 1 ½” strips of both papers and then cut these into 1 ½” squares. When you glue these onto the front of the box, you will leave a ¼” border around the top, bottom and side edges. These edges will be covered with the shimmer trim. Apply lots of Bonding Memories glue pen to the back of each square and use tweezers to pick them up and position them on the box. This will keep your fingers clean for smoothing each square down. Continue the squares on the sides and top of the box. I used the White Pines paper to cover the back and base.


Now it's time to add the Green Shimmer Trim to the edges. For the front of the box, you need to cut the shimmer trim to the length of the box and then mitre the corners by cutting off at a 45° angle. This will give you nice clean corners with no bumps. You then need to cut 6 more pieces with square ends at 1 ½” for the top and bottom of the sides and the ends of the top of the box as shown in the photos. You will need some scraps of Colonial White cardstock to stamp your images on. I stamped the bauble twice in Fern Ink and once in Cranberry. I stamped the frame in Fern and then the Merry Everything in Cranberry. I then cut these out with my Micro Tip Scissors. I adhered the Merry Everything with foam tape on the front of the lid and then I adhered the baubles on the front using Glue Dots.


Here is a card I also made with the same products. I hope you like it!

I would love you to leave a comment before heading off to the next blog
  
Thanks for looking!

Georgia O'Shea


Tuesday 15 September 2015

Hello, Life! - National Stamping Month Australasian Blog Hop

Welcome to the Hello, Life! 
Australasian CTMH Blog Hop
for September - National Stamping Month


If you have arrived here from


then you are in the right place. If you landed here by accident, that's okay, please join in by following the link at the end of this post which will take you to the next Consultant's great ideas. Don't forget to leave your comments and Pin any of the ideas you love to Pinterest!
Hello Life!

Close To My Heart has something to help every kind of papercrafter say a big “hello” to life!

These Exclusive C-size stamp sets can be purchased for $21 each OR for an even better deal, purchase all three for only $53 - a saving of $10!

Each stamp set is designed to fit with a specific type of papercrafting, whether that’s traditional scrapbooking, cardmaking, or pocket scrapbooking. All the stamp sets coordinate with each other and can also be used together to create dynamic artwork. These stamp sets also coordinate with shapes from the new Cricut® Artistry collection to help expand your artwork options even further.


This is the double page layout I have created using the Hello Life! - Scrapbooking Stamp set CC1040 and Nevermore Paper Pack. This paper pack is designed for Halloween but, as you can see, it works for any photos!


The flowers that I stamped on White Daisy cardstock, I just fussy cut out with my Non-stick Micro Tip Scissors. They are fabulous for cutting finer details. I raised one of each with 3D Foam tape and stamped the leaves directly onto the page with Black Exclusive Ink.

I used a different Stamp Set for the banner - D1648  Snapshot  Memories and daubed around the edge with Black Ink. I then added some Clear Sparkles for bling! Cardstock colours used are Sunset, Eggplant, Pear and Black.
All products used can be purchased from my website here.

I would love you to leave a comment before heading off to the next blog


Thanks for looking!

Tuesday 1 September 2015

Paper Garden S1509 - CTMH September SOTM Blog Hop

Hello and welcome aboard our
Australasian Close To My Heart
SOTM Blog Hop.

 If you have arrived here from


then you are in the right place. If you landed here by accident, that's okay, please join in by following the link at the end of this post which will take you to the next Consultant's great idea. Don't forget to leave your comments and Pin any of the ideas you love to Pinterest!


Today I would like to share with you a double page layout which features September 2015 Stamp of the Month


available exclusively throughout September for $7.50 when you spend $75. Or just pay rrp of $27 for the SOTM if you don't need to order $75 worth this month. 


I really wanted to try background stamping with these stamps and as you can see, I went a little crazy with colour! I chose Cashmere, Sorbet and the new Pomegranate Inks and Cardstocks.


I started with the Cashmere Ink and randomly stamped different flowers on the White Daisy Cardstock. I then stamped in Sorbet and finished with Pomegranate. I chose Sorbet Cardstock to mat the photos and roughed up the edges with our Edge Distresser to show the white core of the cardstock.


I daubed the edges of the white journal box with Pomegranate and stamped another flower image.

I added a strip of Cashmere Cardstock along the top of the Sorbet photo mats. The Thick Twine down the sides is also our new colour Poppy Z3094.


I added a couple of Pomegranate Cardstock accents, some bling and our new Coral Shimmer Trim Z3088 along the bottom. 

I would love you to leave a comment before heading off to the next blog

  
Thanks for looking!


Saturday 1 August 2015

Framed S1508 - August Stamp of the Month

Hello and welcome aboard our
Australasian Close To My Heart
SOTM Blog Hop.

 If you have arrived here from

then you are in the right place. If you landed here by accident, that's okay, please join in by following the link at the end of this post which will take you to the next Consultant's great idea. Don't forget to leave your comments and Pin any of the ideas you love to Pinterest!

Framed S1508 - August 2015 SOTM


This month is exciting because we have released a NEW My Reflections Paper Pack, Complements, Assortment and Workshop on the Go Kit
 called ZOE! It is available NOW.


I have made a pretty birthday card using the new Zoe Papers(X7197B) and Complements(X7197C) combined with August SOTM-Framed S1508 available exclusively throughout August for just $5 when you spend $75. Or you can just buy it for the rrp of $27.


The top section of the card has a piece of Sorbet cardstock which I embossed using the Dot Embossing Folder (Z1924) on the Cuttlebug.
The bottom section has a piece of new Zoe B&T duos with a cute spotty design and a smaller piece of Glacier Cardstock on top.
Through the centre is our gorgeous NEW Coral Shimmer Trim (Z3088). 


I stamped the Framed image in Glacier Ink (Z2641) on a scrap of White Daisy Cardstock and cut it out with my Micro Tip Scissors. I then stamped Happy Birthday in Sorbet Ink (Z2164) and used 3D Foam tape to adhere it to the card.
Next I chose some of the sweet little flowers and leaves from the Zoe Complements to adhere onto the Glacier piece then added Bitty Sparkles for some bling! 
Here are a couple more designs from CTMH.


I would love you to leave a comment before heading off to the next blog


Thanks for looking!

Tuesday 7 July 2015

Life is Wonderful SOTM S1507 layout with Blossom Paper


I whipped up this layout today because I was inspired when I looked at some artwork in our Seasonal Expressions 2 (The Idea book with the strawberries on the front).
I am in LOVE with this Stamp Set!


 Here is the inspiration...


The cutting guide for this layout is in Make It From Your Heart Vol 2, Pattern 14. I used Blossom B&T duos instead of the background stamp with Pear, Hollyhock and Black Cardstock.


The first thing I did was stamp the decorative frame 7 times on White Daisy Cardstock in Black Exclusive Ink. Then I stamped Life is inside one of the frames, Wonderful in Cranberry Ink and Always Remember in Black Ink on Pear Cardstock. I cut out all the frames (they are not perfectly square) and rounded the corners then fussy cut around the Wonderful. I cut the Pear piece with Always Remember into a flag and gave it a White Daisy mount. I adhered it onto my Black page using 3D Foam Tape. I also used foam tape to stick the word Wonderful onto the Life is frame. A half inch strip of the Blossom paper is running along the bottom of the page showing the reverse pattern on the back.


The frames can be used for photos or to journal. Finally I added a few Clear Sparkles for some bling!


All products used can be found on my website www.georgiaoshea.ctmh.com.au
Thanks for looking!

I would love you to leave a comment, thanks.

Wednesday 1 July 2015

Life is Wonderful S1507 July 2015 - CTMH Stamp of the Month Australasian Blog Hop

Life is Wonderful S1507 


Hello and welcome aboard our SOTM Australasian Close to My Heart Blog Hop. If you have arrived here from


then you are in the right place. If you landed here by accident, that's okay, please join in by following the link at the end of this post which will take you to the next great idea. Don't forget to Pin any of the ideas you love to Pinterest!


Today I would like to share with you this album page which features July 2015 Stamp of the Month S1507 Life is Wonderful available exclusively throughout July for just $5 when you spend $75. Or just pay rrp of $27 for the SOTM if you don't need to order $75 worth this month. We also have a promotion this month where you can get it for FREE so I will add the info at the bottom of this post.


I found the layout I wanted to use for my photos in Make It From Your Heart Vol 1, Pattern 3, right page. Then I chose my papers and embellishments from our Jackson range.


First I used White Daisy Ink to stamp "Life is" and the frame onto Barn Red Cardstock. Then I stamped "Life is" and "Wonderful" onto White Daisy Cardstock using Crystal Blue Exclusive Ink. I fussy cut out the banner with "is" on it and also cut around the word Wonderful. 

I then followed the cutting guide to add the Jackson papers to my layout.  Once my papers and photos were adhered to the page, I stuck the "is" banner down with Glue Dots for a little depth and "Wonderful" with 3D Foam Tape for more depth!

 I also stamped the arrow straight onto the page using Barn Red Ink and added some Durables Triangle Studs.


All the CTMH products used can be found on my website here.

During the month of July, when you purchase $32.50 in stamps, you qualify to receive either the July Stamp of the Month, Life Is Wonderful, FREE or any one of the Hostess Rewards stamp sets in Annual Inspirations 2014–2015 or Seasonal Expressions 2 for only $6.50! That is a savings of up to $27! To get your FREE stamp set or your $6.50 Hostess Rewards stamp set, simply place an order for $32.50 of any current stamps. 


I would love you to leave a comment before heading off to


Thanks for looking!